Heater Planner Operative

Infrared Heater Planner

All suggested sizes for the heating areas using this calculation example are subject to the overall insulation value of the property in question and have been calculated based on assuming the property is of modern build with Low Emissivity Double Glazing installed. As a result we have used an Energy Requirement Factor (ERF) of 22 Watts per m3 (see our Wattage Guide below).

Your Planning Made Simple

We hope this example will help make planning your new heating requirements easy, but please remember we have a dedicated Support Team at your disposal if you have any queries. So should you require any assistance, or if you wish for us to plan your heating for you, then please go to our Contact Us page and complete the Enquiry Form provided.

Our Wattage Guide

Our recommended MINIMUM Wattage per m3 to enjoy comfortable heating in your home or office (based on a modern building with good insulation). Give us a call if in any doubt.

40 - 45 Watts/m3 - Conservatories.
35 Watts/m3 - bathrooms.
30 Watts/m3 - children's room; living rooms; offices; care homes etc.
25 Watts/m3 - kitchens; bedrooms.
20 Watts/m3 - hallways.

In practice, once you have calculated your m3 requirements per each room you intend to install Infrared Panel Heaters into, you will then need to decide on the combination of panels required - see examples below.

Couple Sitting Planning

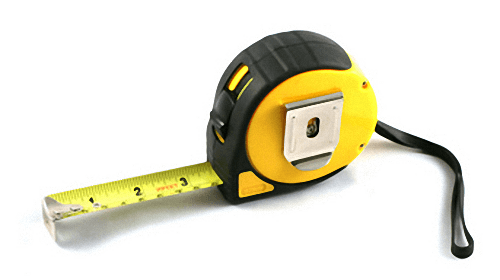
1. MEASURING YOUR ROOM

In order to start your planning you will need the measurements of the rooms you wish to heat. These measurements must include: Width (W) Length (L) Ceiling Height (H).

Once measured we need to ascertain the total room volume, this is one of the main pieces of information needed in order to select the correct heater size.

Example:
Room Size: Width = 3500mm; Length = 3600mm; Ceiling Height = 2440mm.
Total Volume = 3500 x 3600 x 2440 = 30.74m3.

We then always round the volume up to the nearest whole number, therefore in this example the Total Volume = 31m3.

Based on the room being adequately insulated, with modern double glazing installed, we would normally base our calculation on 22 Watts per m3. If you are unsure please contact us.

We can now calculate what power rating in terms of Wattages of heating is required 31m3 x 22 Watts = 682 Watts.

2. MATCH TO HEATER SIZES

Taking into account our total room size and using the power rating of 22 Watts per m3, referred to as the building or room Energy Requirement Factor (ERF), we have ascertained that the heating element power required should be not less than 682 Watts. We would now select the heater element(s) that is the nearest size up from the 682 Watts we need (i.e. bigger than 682 Watts). In our example we would select a heater wattage of 700 Watts.

Important: The wattage you have calculated is always the minimum required so if your calculation works out to be 545 Watts then the required heater is always the next model up i.e. 600 Watts or whatever is closest. Please don’t be tempted to use the model below as it may not achieve the required heat levels.

What if your calculated result is greater than 700 Watts.

Example for a room size of 6000mm x 3500mm x 2440mm, this would give us a total volume of 51.24m3.

This equates to a required wattage of 52 x 22 = 1144 Watts.

Clearly we need more than 1 heating element in this room.

The choice of how many and of what size(s) is totally your choice and can be subject to how your room is furnished.

The easiest option would be the following:
1144 Watts – 700 Watts (element) = 444 Watts.
444 Watts = 1 x 500 Watts (element).

So the room will require 1 x 700 Watt element and 1 x 500 Watt element if available in your selected heater model range.

However we could also consider the following option in order to have equally sized heaters in the room,
2 x 600 Watt if available in the heater range selected OR even 3 x 400 Watts. Again the combination as to how to build up your required coverage could depend on the shape of your room and where everyone congregates when it gets colder at night (e.g. everyone clusters in one side of the room in the evenings so why heat the other end, or if an L shaped room, around the corner where no-one uses, etc.

3. PLANNING SHAPED ROOMS AND HALLWAYS

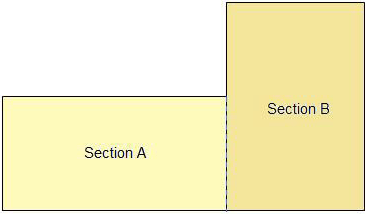
If your room is not rectangular, L-Shaped for example then it should be divided into two sections.

Each section should then be calculated using the same process as for a single room.

Room Planning

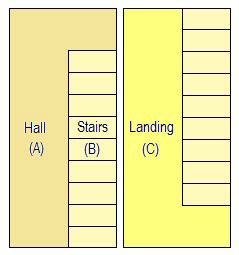
Hallway, Stairs and Landing should be calculated by separately measuring each section.

Example:
Hall 5.0m x 0.8m x 2.5m = 10m3.
Landing 4.0m x 0.8m x 2.5m = 8m3.
Stairs 6.5m x 0.8m x 2.5m = 13m3.

We now divide the area of the stairs by 2 and add the result to both the Hall and Landing areas. This will ensure that both heaters produce enough heat for the stairs as no heater is normally installed there.

13m3 / 2 = 6.5 m3.
Hall 10m3 + 6.5m3 = 16.5m3.
Landing 8m3 + 6.5m3 = 14.5m3.

We then calculate the correct heater size as follows:

Hall 16.5m3 x 22 Watts = 363 Watts.
Landing 14.5m3 x 22 Watts = 319 Watts.

We now select from the infrared heater model range what heater sizes are required.Hall No Less Than 363 Watts = 1 x 400 Watt heater.
Landing No Less Than 319 Watts = 1 x 350 Watt OR = 2 x 200 Watts if you have a long alleyway distance to cover.

It isn't a science, however in certain cases a little thought as to what we need where and what we have available can save you money at times. However, if you do play safe and go bigger is better, then the energy released from the slightly larger heater model would be quicker to penetrate the area objects and would therefore heat up quicker, and fitted with thermostat temperature controllers your energy bills will be no higher at the end of the day and could even be more efficient in keeping you warm for longer periods.

Planning of Stairs

4. POSITIONING HEATERS

If you are planning on installing multiple heaters it is recommended that they are shared throughout the room, this will ensure an even temperature.

You may even want to consider ceiling mounting so the heaters project the heat directly downwards into the area and they can be cleverly concealed in the ceiling especially if you have a false roof with ceiling tiles already installed. It is also important to ensure that wall mounted heaters are not directly pointing to doorways, archway or window openings.

Most of our heater panels can be wall or ceiling mounted. The Designer Glass range however is intended for wall mounting due to it's physical weight.

Further Assistance

If you are in any doubt when it comes to planning your heating please contact us and we'll be only too happy to assist.

Telephone or Email our Support Team:

Phone: 0800 820 2025 OR 0191 420 9838
Email: enquiries@eco-ne.co.uk

TOP
Select the fields to be shown. Others will be hidden. Drag and drop to rearrange the order.
  • Image
  • SKU
  • Rating
  • Price
  • Stock
  • Availability
  • Add to cart
  • Description
  • Content
  • Weight
  • Dimensions
  • Additional information
  • Attributes
  • Custom attributes
  • Custom fields
Click outside to hide the compare bar
Compare